
How To Make Your Own Floss Separator for Cross Stitching or any Needlework
Floss Separators are commercially sold and are sometimes included in cross stitch kits.
Floss Separators are awesome to use when you have an empty separator card on hand. However, crafters often start a new needlework project when inspired and we don’t want to run to the store to purchase a floss separator and we certainly don’t want to wait for one to be shipped to us before we start our new project.
Let me show you how to make your own quick and easy Floss Separator.
What is a Cross Stitch Floss Separator?
50 Anchor Embroidery Cross Stitch Threads Floss/Anchor Stranded CottonCheck PriceIt does sound a bit like we are discussing dental hygiene, but I am actually referring to the craft and cross stitch thread known as floss.

Often the threads are so close in color on a cross stitch project, that it is really easy to grab the wrong color thread and not realize you error for hours which results in having to remove all of your recent work. That can be extremely frustrating.
In order to ensure you are actually picking up the correct colors in the pattern, it is wise to separate and label your project threads first. Thus, cross stitchers use a thread or floss separator.
Why Do We Need Floss Separators
 I cannot stress enough how important it is to separate your floss thread colors before you begin a new needlework or cross stitch project. It can be nearly impossible to tell the difference between some colors once you get started and you certainly do not want to have to stop your progress to carefully compare and analyze thread colors.
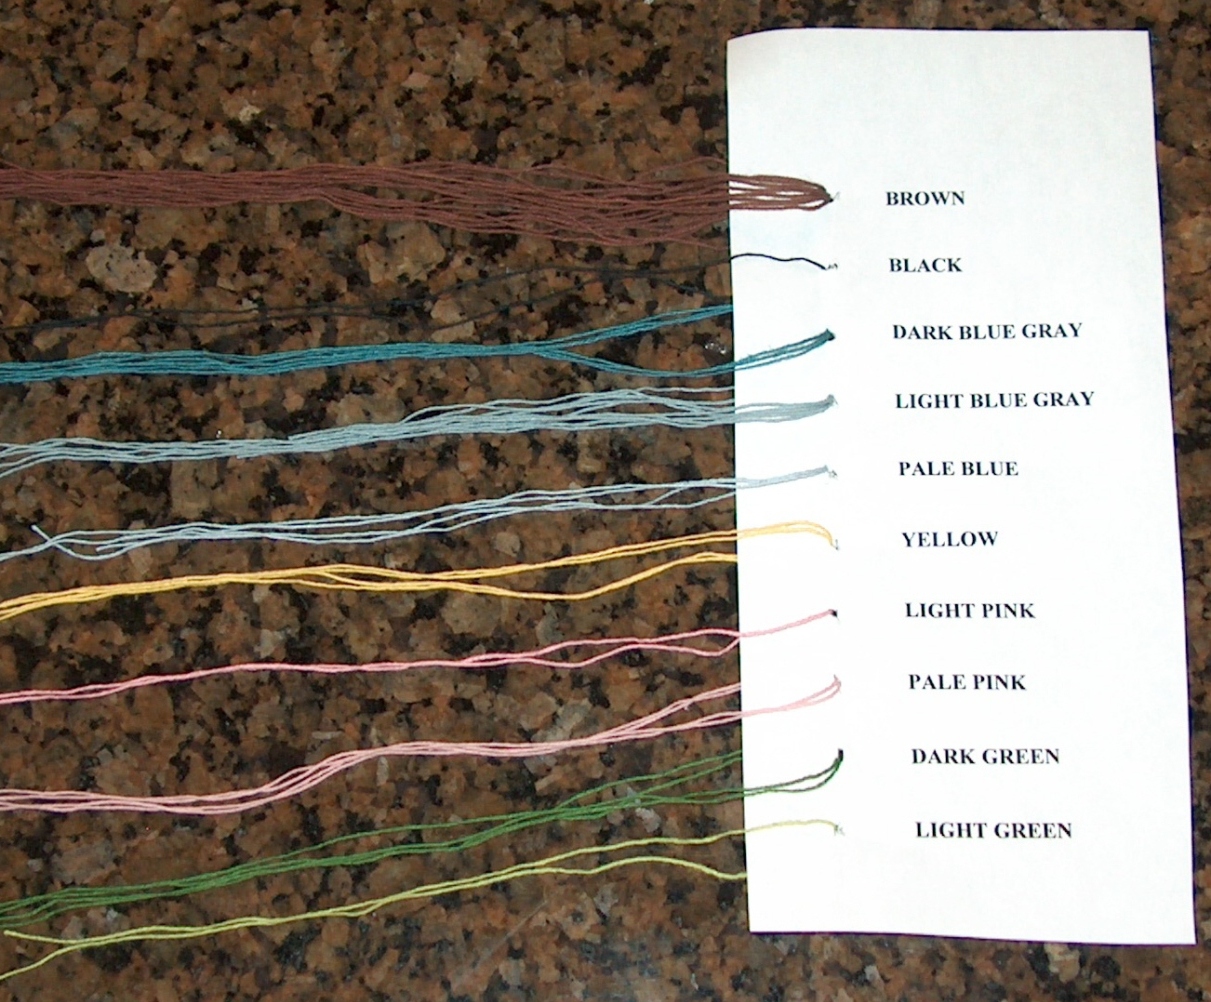
Look at the featured picture here. You can see for yourself how hard it is to tell Light Blue from Pale Blue or Light Green from Yellow or Light Pink from Pale Pink.
How to Make A Floss Separator
 I make my own color separators by simply typing the colors in my word processor (triple space between each name) and then printing it. I cut the printed paper down to approx. 9″ x 3″.
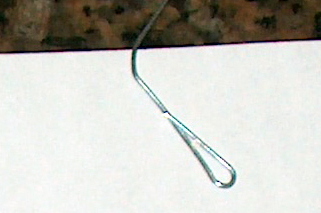
I use a “modified” paper clip to make holes and pull the floss through the paper.
It is truly that simple!
Make Your Floss Separator to Last Longer
If you know you will be using this separator for a long period of time, you can “laminate” the homemade floss separator by covering it with clear packing tape on both sides before you poke the hole and pull the floss through the floss holder / separator.

7 Comments
Lesley
Where do you find the time to be so awesome and amazing at everything you do?
Sylvestermouse
Believe me! There are many things I cannot do, but thank you for the compliment 🙂
Kim Giancaterino
I love these floss holders because it makes traveling with a small project so simple. I’m going to start doing them on the computer and reinforcing with tape. Great ideas!
Lynne
You could also use some light card stock and a single hole punch
Sylvestermouse
You are absolutely right! I don’t often have card stock on hand, but I am quite certain that would make an even steadier organizer.
BuckHawk
What a great idea! I bought one many years ago that I have used to separate my floss for all my big projects, but I do need something for the smaller projects that I take with me, especially at this time of year.
Mandee
What a great idea! You are such a crafty mouse. Thanks for the idea for floss separators!